GH60 Satan Mechanical Keyboard
I'm in love with a keyboard?
I recently decided to get a mechanical keyboard, and I love it! I got crazy and went with a 60% sized keyboard, also known as a pok3r, and I couldn't be happier.
Research
I did a lot of research before I decided to get a mechanical keyboard. I didn't even know this was a 'thing' until I started to see pictures of people's workspaces that had these crazy looking keyboards with different keycap colors, legends (the font/symbol on a key), and key layouts.
The first place that I went to to start learning about mechanical keyboards (MKs) was reddit. The /r/MechanicalKeyboards subreddit is an awesome resources for learning about MKs. Check out their wiki for a lot of good information on where to start if you are interested in getting a MK. The subreddit is also a good place to see pictures of what other people are doing with their keyboards. That is where I got the idea for what I wanted.
Switches
One very important decision you need to make when getting a mechanical keyboard, and the reason they are called mechanical keyboards, is the type of switches you want. There are quite a few different kinds of key switches. Some switches are loud, some are quiet, some give tactile feedback when pressed. It is important to look into what switches you think would work best for you. A lot if people like the Cherry MX style switches. I like the linear motion switches that don't have tactile feedback. I also like fairly strong key force, so I went with the Cherry MX Black switches which have a 60g activation force. Many people like the Cherry MX Brown and Cherry MX Blue switches. Take a look at the /r/MechanicalKeyboards Switch Guide for more information on picking switches that are right for you. One thing that helped me decide on the switches I wanted was buying a switch sample kit. WASD Keyboards sells a nice 6-Key Cherry MX Switch Tester for $15. They also sell custom mechanical keyboards as well.
My Keyboard
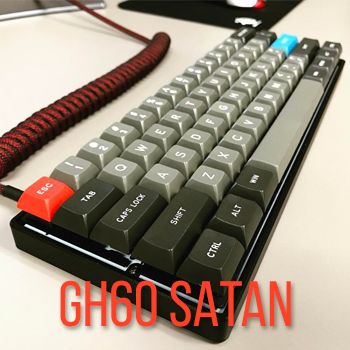
After looking around for awhile, I decided the 60% form factor would suit my needs quite well. I looked around a lot after picking the 60% size to find a good board that would allow for the customizations I wanted. A board that caught my eye was the GH60, which stands for GeekHack 60%. It was a board that was put together by the GeekHack community. I couldn't find that particular board, but I did end up finding a Chinese knockoff called the Satan, or GH60 Satan as it has come to be known.
I ended up ordering a DIY kit from a website called AliExpress. The specific kit I ordered was the Customized GH60 Full Kit. I picked the following options for my keyboard:
- Kit 2
- Aluminum Black Case
- Aluminum Black Plate
- Cherry MX Black Switches
- Mixed Color ANSI PBT Keycaps
- 3mm White LEDs
- Added SIP Sockets
- Added seller assemble keyboard
In total, I ended up paying about $186 for the keyboard. You might think that sounds like a lot, but I use a keyboard for 8+ hours a day. I decided it was like not skimping on a mattress, I mean, you do spend about one-third of your life sleeping, you might as well be comfortable, right?
Customizations
You have this little keyboard, now what? Where are the arrow keys? Where are the F1-F12 keys? How do you use this thing? The keyboard has different layers. Each layer can have different keys on it. The layer that you see when you look at the keyboard is the base layer or Layer0. This is your base typing layer and typically is in the QWERTY layout. The five keys to the right of the TAB key spell QWERTY. It is what most people are used to typing on. There are other popular keyboard layouts like DVORAK or Colemak, but we won't get into those.
The GH60 Satan can support up to 8 layers. So, by using and switching to these other layers, we can get back the missing keys. Using some great online tools, putting together your layers is relatively easy.
Layers
I started by using the online tool Keyboard Layout Editor. From the Preset list at the top, I picked the Default 60% layout and worked from there. As we go through the different layers you will see that the red FN0 key causes the red keys to show up, the green FN2 key causes the green keys to show up, etc. I will explain things as we go.
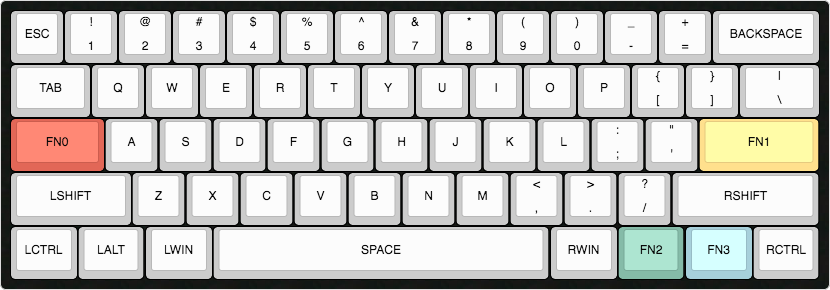
Layer0 - QWERTY
Here is my base layer. You will notice that I do not have a Caps Lock key. I have replaced it and made it my primary layer switching key. Also, the Enter (yellow FN1 key) key has a unique function here. Pressing the Enter key once makes it act like the standard Enter key, but holding the Enter key down causes it to act like you are holding Ctrl+Alt+Shift+Command on the Mac (also known as the Hyper key).
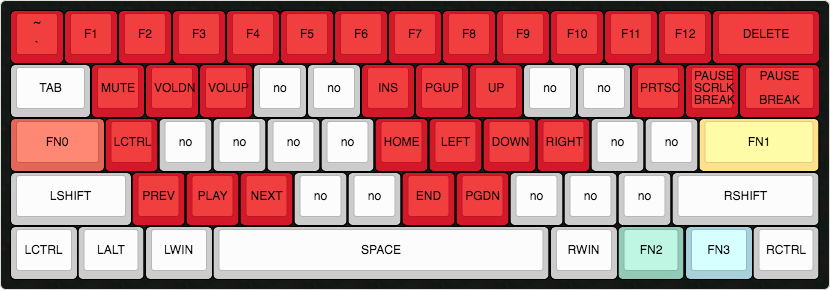
Layer1 - FN0
This layer only shows up if you hold the red FN0 key down. As soon as you let go of the key, it switches back to the base QWERTY layer. This is called a momentary layer. You will notice that the following layer brings back the F1-F12 keys. It adds in the arrow keys as Up, Down, Left, Right. It switches the Backspace key to Delete. You can also see that the volume controls and music Previous, Play/Pause, and Next are all easily accessible. On my Mac, I have Ctrl+Left or Right switches desktops. So that I don't have to move my fingers very far, I have it so that the A key switches to Ctrl so that I can keep my fingers on the home row of the keyboard and move around.
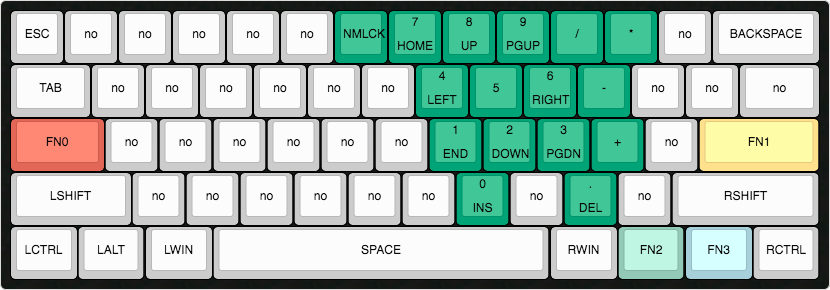
Layer2 - FN2
This layer shows up when you press the green FN2 key. This layer sticks after you press FN2 until you press FN2 again, and then it switches back to the base QWERTY layer. Think of this layer like pressing the NumLock key and turning on the number pad.
Layer3 - FN3
This layer shows up when you hold the blue FN3 key down. As soon as you let go of the key, it switches back to the base QWERTY layer. This layer contains some special function keys, FN4-FN7, used to cycle through the LED settings that the keyboard has built-in. The FN8 key is programmed to perform Ctrl+Alt+Delete. The FN9-FN12 keys don't do anything.

Programming
Now, after we have all of these layouts put together, we have to bake them into an EEP file that can be used to program the keyboard. For this, we will use the TMK Keymap Generator. This site is where we will also specify how the FN keys all work and some other unique stuff.
Steps
- Under General > Keyboard select the GH60 (RevCHN) from the dropdown list.
- Under Layer > Layer Mode select Normal.
- Under Layer > Number of Layers select 4.
- Under Layer > Layer0 copy and paste the following:
[{a:7},"ESC",{a:5},"!\n1","@\n2","#\n3","$\n4","%\n5","^\n6","&\n7","*\n8","(\n9",")\n0","_\n-","+\n=",{a:7,w:2},"BACKSPACE"],
[{w:1.5},"TAB","Q","W","E","R","T","Y","U","I","O","P",{a:5},"{\n[","}\n]",{w:1.5},"|\n\\"],
[{c:"#e26757",a:7,w:1.75},"FN0",{c:"#cccccc"},"A","S","D","F","G","H","J","K","L",{a:5},":\n;","\"\n'",{c:"#ffe08d",a:7,w:2.25},"FN1"],
[{c:"#cccccc",w:2.25},"LSHIFT","Z","X","C","V","B","N","M",{a:5},"<\n,",">\n.","?\n/",{a:7,w:2.75},"RSHIFT"],
[{w:1.25},"LCTRL",{w:1.25},"LALT",{w:1.25},"LWIN",{w:6.25},"SPACE",{w:1.25},"RWIN",{c:"#85bba8",w:1.25},"FN2",{c:"#a7d0db",w:1.25},"FN3",{c:"#cccccc",w:1.25},"RCTRL"]
- Under Layer > Layer1 copy and paste the following:
[{c:"#d31929",a:5},"~\n`",{a:7},"F1","F2","F3","F4","F5","F6","F7","F8","F9","F10","F11","F12",{w:2},"DELETE"],
[{c:"#cccccc",w:1.5},"TAB",{c:"#d31929"},"MUTE","VOLDN","VOLUP",{c:"#cccccc"},"no","no",{c:"#d31929"},"INS","PGUP","UP",{c:"#cccccc"},"no","no",{c:"#d31929"},"PRTSC",{a:5},"PAUSE\nBREAK\n\n\n\n\nSCRLK",{w:1.5},"PAUSE\nBREAK"],
[{c:"#e26757",a:7,w:1.75},"FN0",{c:"#d31929"},"LCTRL",{c:"#cccccc"},"no","no","no","no",{c:"#d31929"},"HOME","LEFT","DOWN","RIGHT",{c:"#cccccc"},"no","no",{c:"#ffe08d",w:2.25},"FN1"],
[{c:"#cccccc",w:2.25},"LSHIFT",{c:"#d31929"},"PREV","PLAY","NEXT",{c:"#cccccc"},"no","no",{c:"#d31929"},"END","PGDN",{c:"#cccccc"},"no","no","no",{w:2.75},"RSHIFT"],
[{w:1.25},"LCTRL",{w:1.25},"LALT",{w:1.25},"LWIN",{w:6.25},"SPACE",{w:1.25},"RWIN",{c:"#93c9b7",w:1.25},"FN2",{c:"#a7d0db",w:1.25},"FN3",{c:"#cccccc",w:1.25},"RCTRL"]
- Under Layer > Layer2 copy and paste the following:
[{a:7},"ESC","no","no","no","no","no",{c:"#00a477"},"NMLCK",{a:5},"7\nHOME","8\nUP","9\nPGUP",{a:7},"/","*",{c:"#cccccc"},"no",{w:2},"BACKSPACE"],
[{w:1.5},"TAB","no","no","no","no","no","no",{c:"#00a477",a:5},"4\nLEFT",{a:7},"5",{a:5},"6\nRIGHT",{a:7},"-",{c:"#cccccc"},"no","no",{w:1.5},"no"],
[{c:"#e26757",w:1.75},"FN0",{c:"#cccccc"},"no","no","no","no","no","no",{c:"#00a477",a:5},"1\nEND","2\nDOWN","3\nPGDN",{a:7},"+",{c:"#cccccc"},"no",{c:"#ffe08d",w:2.25},"FN1"],
[{c:"#cccccc",w:2.25},"LSHIFT","no","no","no","no","no","no",{c:"#00a477",a:5},"0\nINS",{c:"#cccccc",a:7},"no",{c:"#00a477",a:5},".\nDEL",{c:"#cccccc",a:7},"no",{w:2.75},"RSHIFT"],
[{w:1.25},"LCTRL",{w:1.25},"LALT",{w:1.25},"LWIN",{w:6.25},"SPACE",{w:1.25},"RWIN",{c:"#93c9b7",w:1.25},"FN2",{c:"#a7d0db",w:1.25},"FN3",{c:"#cccccc",w:1.25},"RCTRL"]
- Under Layer > Layer3 copy and paste the following:
[{a:7},"ESC",{c:"#408fb3"},"FN9","FN10","FN11","FN12",{c:"#cccccc"},"no","no","no","no","no","no","no","no",{w:2},"BACKSPACE"],
[{w:1.5},"TAB",{c:"#408fb3"},"FN8",{c:"#cccccc"},"no","no","no","no","no","no","no","no","no","no","no",{w:1.5},"no"],
[{c:"#e26757",w:1.75},"FN0",{c:"#cccccc"},"no","no","no","no","no","no","no","no","no","no","no",{c:"#ffe08d",w:2.25},"FN1"],
[{c:"#cccccc",w:2.25},"LSHIFT",{c:"#408fb3"},"FN4","FN5","FN6","FN7",{c:"#cccccc"},"no","no","no","no","no","no",{w:2.75},"RSHIFT"],
[{w:1.25},"LCTRL",{w:1.25},"LALT",{w:1.25},"LWIN",{w:6.25},"SPACE",{w:1.25},"RWIN",{c:"#93c9b7",w:1.25},"FN2",{c:"#a7d0db",w:1.25},"FN3",{c:"#cccccc",w:1.25},"RCTRL"]
- In the top right corner of the page click on Tools > Import Fn and copy and paste the following:
"0":["ACTION_LAYER_MOMENTARY",1],"1":["ACTION_MODS_TAP_KEY","LR_LEFT",["MOD_CTL","MOD_SFT","MOD_ALT","MOD_GUI"],"KC_ENTER"],"2":["ACTION_LAYER_TOGGLE","2"],"3":["ACTION_LAYER_MOMENTARY","3"],"4":["ACTION_BACKLIGHT_TOGGLE"],"5":["ACTION_BACKLIGHT_STEP"],"6":["ACTION_BACKLIGHT_DECREASE"],"7":["ACTION_BACKLIGHT_INCREASE"],"8":["ACTION_MODS_KEY","LR_LEFT",["MOD_CTL","MOD_ALT"],"KC_DELETE"],"9":["ACTION_NO"],"10":["ACTION_NO"],"11":["ACTION_NO"],"12":["ACTION_NO"]
- At the bottom, click the green Download .eep file button and save the EEP file in a place that you can find it.
Flashing Keymap to Keyboard
You will need to download or clone the tkg-toolkit git repository to your system. This holds the tools you will need to flash the keymap to the keyboard. Once you have the git repository on your computer, you will want to place the keymap.eep file that you downloaded into the proper folder for the system you are using. In my case, I used the mac folder.
After I placed my keymap.eep file in the mac folder, I ran the setup.sh and selected:
- GH60 RevCHN
- Y
- Default
- atmel_dfu
Next run the reflash.sh process. To get it to flash your keymap file you need to type the following:
./reflash.sh ./keymap.eep
Now, flip your keyboard over, and there is a hole in the bottom with a small button in it. Push the button to put the keyboard into bootloader mode so that it can accept the process. It will take a few seconds to send the firmware and keymap to the keyboard. It will tell you when it is done and then the keyboard should begin responding.
Bam! You now have a custom mechanical keyboard with a custom keymap. Now, start customizing to your heart's content. When you are comfortable with the above customizations, you can try putting together your own keymap and building it into the firmware itself. Doing this will give you the ability to write your own macros and functions, which extends your ability to customize. I like the TMK firmware, but there are other choices out there if you look.
Conclusion
Mechanical keyboards are great. Customizable mechanical keyboards are even better. I have really enjoyed my GH60 Satan so far. I ended up ordering a set of DSA Dolch keycaps for my keyboard, and I love them. They are by no means cheap ($100), but I really like the way they look and feel. There are so many choices when it comes to putting together your own MK that the possibilities are endless. I recommend doing some research to start off to make sure that you will be happy with your first MK.
Useful Links
Here are a few links that I found to be useful while I was putting my MK together.